How to Integrate M-Pesa API: Complete Guide 2026
The Short Answer Before You Start
There is no single way to integrate M-Pesa on a website in 2026. The right method depends on your platform, budget, and technical capacity.
This guide covers all three paths so you pick the right one from the start — not after wasting weeks going down the wrong route.
Quick Takeaway
WordPress site? Use a plugin — live in hours
Custom site, need speed? Use Paystack or Pesapal — live in a week
High volume or full control? Direct Daraja API — 3–5 weeks but lowest fees at scale
All three paths still require a Safaricom Paybill or Till number for production
Which Path Is Right for You?
Your Situation | Best Path |
|---|---|
WordPress + WooCommerce site | Plugin integration |
Custom site, low-medium volume | Payment gateway |
Custom site, high volume (KSh 500K+/month) | Direct Daraja API |
Need cards + M-Pesa in one integration | Payment gateway |
High-value transactions, fraud risk | Direct Daraja API |
For a full cost breakdown and break-even analysis between payment gateways and direct Daraja integration, see our Paystack vs Direct M-Pesa guide.
Path 1: WordPress Plugin Integration
The fastest route. No backend development required — just a plugin, your Daraja credentials, and a Paybill or Till number.
What you need first:
Active WordPress site with WooCommerce installed
Safaricom Paybill or Till number
Daraja developer account — free at developer.safaricom.co.ke
Consumer Key and Consumer Secret from your Daraja dashboard
Valid SSL certificate on your site — mandatory
Recommended plugins for Kenyan businesses:
WooCommerce M-Pesa Gateway
Most widely used.
Supports direct STK Push
Connects to your Paybill or Till number directly.
Available on WordPress.org.
Pesapal WooCommerce Plugin
Supports M-Pesa plus card payments in one checkout.
Good if you need multiple payment methods without separate integrations.
Tuma Payment Gateway
Open source, supports M-Pesa Paybill, Till numbers, and Kenyan bank accounts. Actively maintained as of 2026.
KopoKopo Lipa Na M-Pesa
Solid option for businesses already using KopoKopo for merchant payments.
Setup steps:
Install and activate your chosen plugin from the WordPress dashboard
Go to WooCommerce → Settings → Payments
Find the M-Pesa option and click Configure
Enter your Consumer Key, Consumer Secret, Paybill or Till number, and Callback URL
Set environment to Sandbox and run test transactions
Once confirmed working, switch to Live and run one real low-amount transaction to verify
Common issues to watch for:
Plugin conflicts — deactivate other plugins temporarily to isolate
Callback URL errors if your SSL certificate is invalid or incomplete
Sandbox credentials accidentally entered in the Live fields
Path 2: Payment Gateway Integration
Best for custom-built sites that need to go live fast without touching the Daraja API directly.
Paystack and Pesapal act as the middleman.(There is a long list of third party providers)
They handle the Safaricom relationship, you integrate once with their API.
What you need:
Business registration documents for account verification
Bank account for settlements
A backend developer — typically 2–3 days of integration work
For the full cost comparison — including exact figures at different monthly volumes and when switching to direct Daraja makes financial sense — read the Paystack vs Direct M-Pesa breakdown.
Path 3: Direct Daraja API Integration
Full control, lowest ongoing fees at high volume, but the most technically demanding path. This is what most developers mean when they say "M-Pesa API integration."
A note on Daraja 3.0
Safaricom launched Daraja 3.0 in November 2025. The platform is now cloud-native with:
Improved reliability and uptime
Redesigned documentation and faster onboarding
New Security APIs for fraud detection and identity verification
Capacity for up to 12,000 transactions per second
If you are starting a new integration in 2026, you are building on Daraja 3.0 — better infrastructure than developers dealt with in previous years.
What You Need Before Starting
Safaricom Daraja developer account — free at developer.safaricom.co.ke
Business Paybill or Till number — start registration in parallel if you don't have one, takes 2–3 weeks
SSL certificate from a trusted authority — self-signed will not work in production
Publicly accessible server — localhost cannot receive Safaricom callbacks
Backend development environment — Node.js, PHP, Python, or similar
Missing any of these? Sort them before writing a single line of code.
Step 1: Register on the Daraja Portal
Go to developer.safaricom.co.ke and create a developer account. Once registered:
Create a new app in the dashboard
Copy your Consumer Key and Consumer Secret
Store them as environment variables on your server — never hardcode them in your codebase or expose them in frontend code
Step 2: Choose the Right Endpoint
Daraja has several endpoints. Most websites only need one to start:
STK Push (M-Pesa Express)
The standard customer payment flow, powers the "Pay with M-Pesa" button
C2B
Customer sends money manually to Paybill or Till, system registers and confirms
B2C
Send money out to customers for refunds, commissions, or payouts
B2B
Business to business transfers between Paybill numbers
Start with STK Push. It covers the majority of customer payment scenarios and has the most straightforward go-live approval.
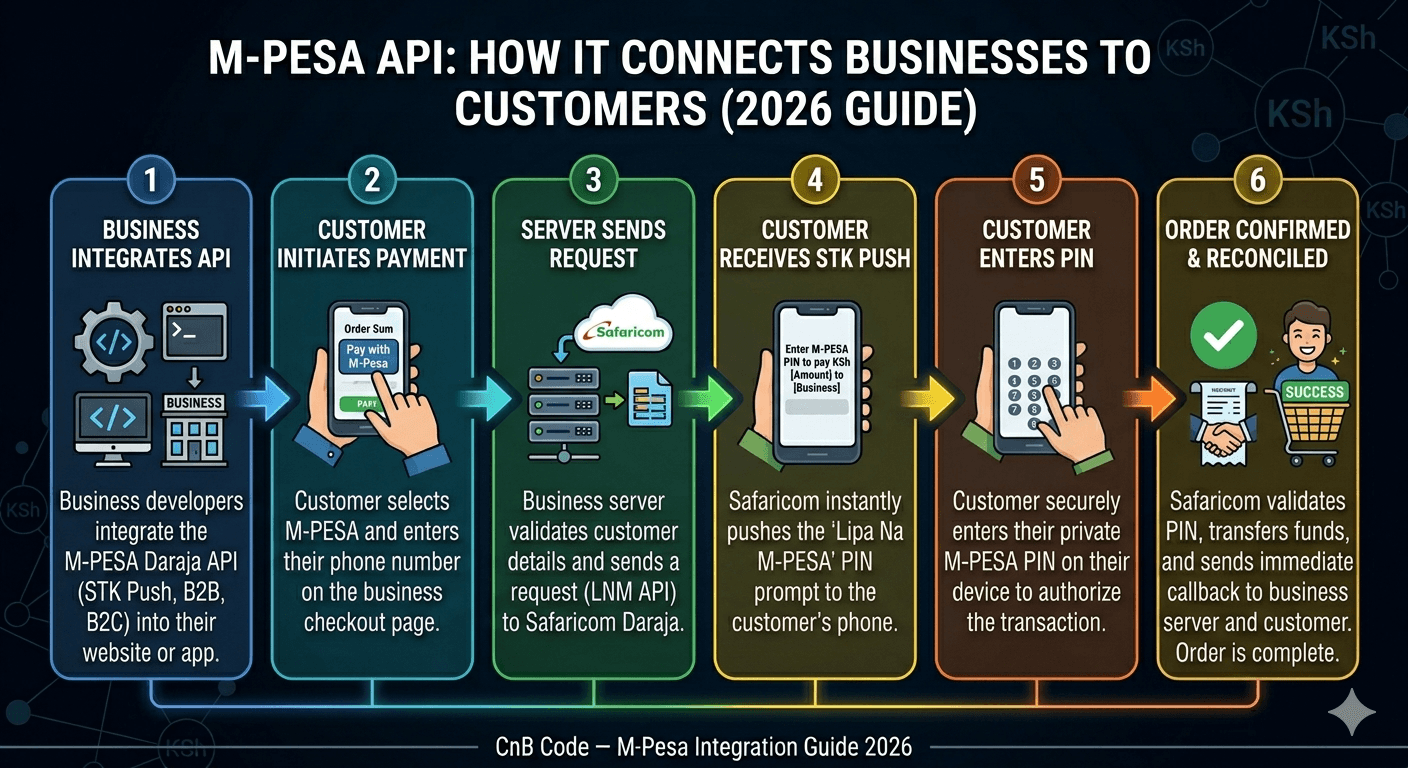
Step 3: Understand the STK Push Flow
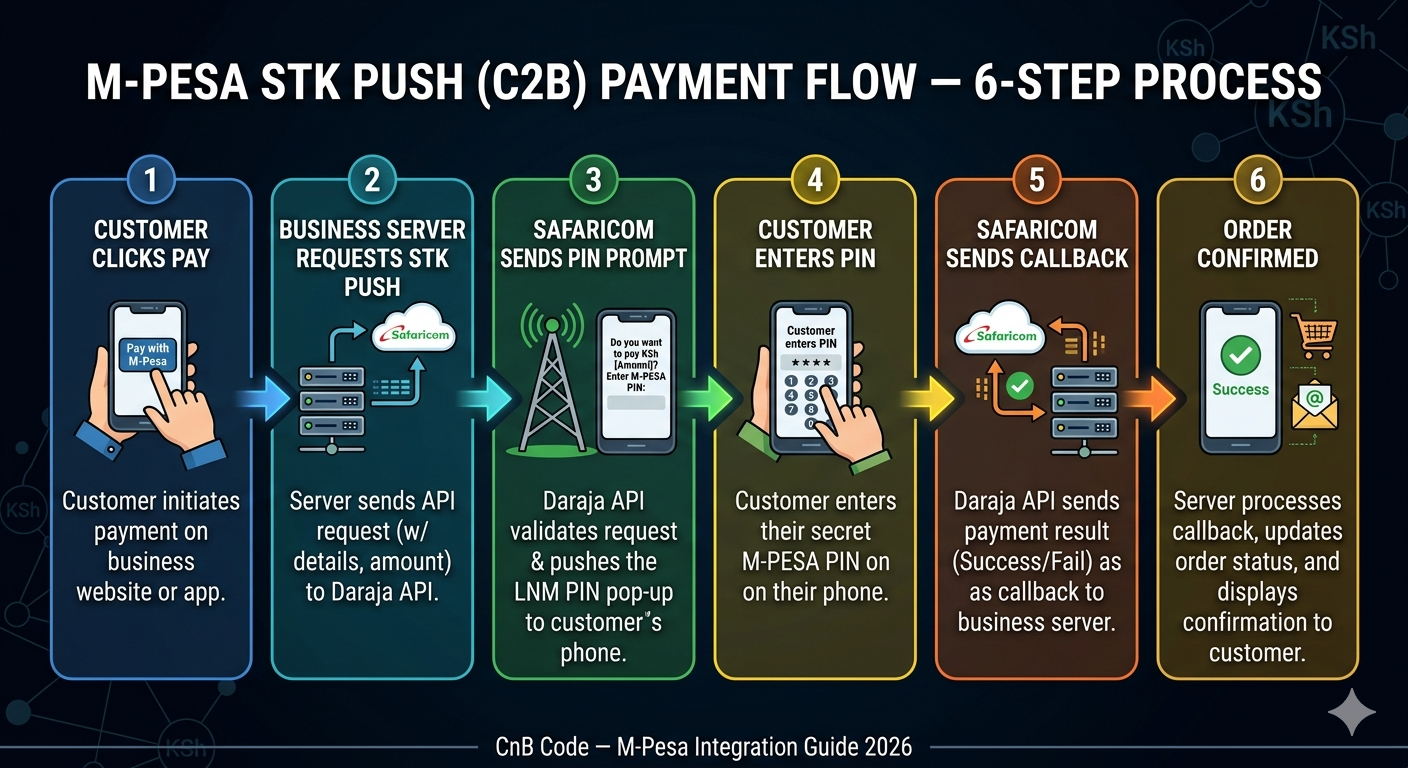
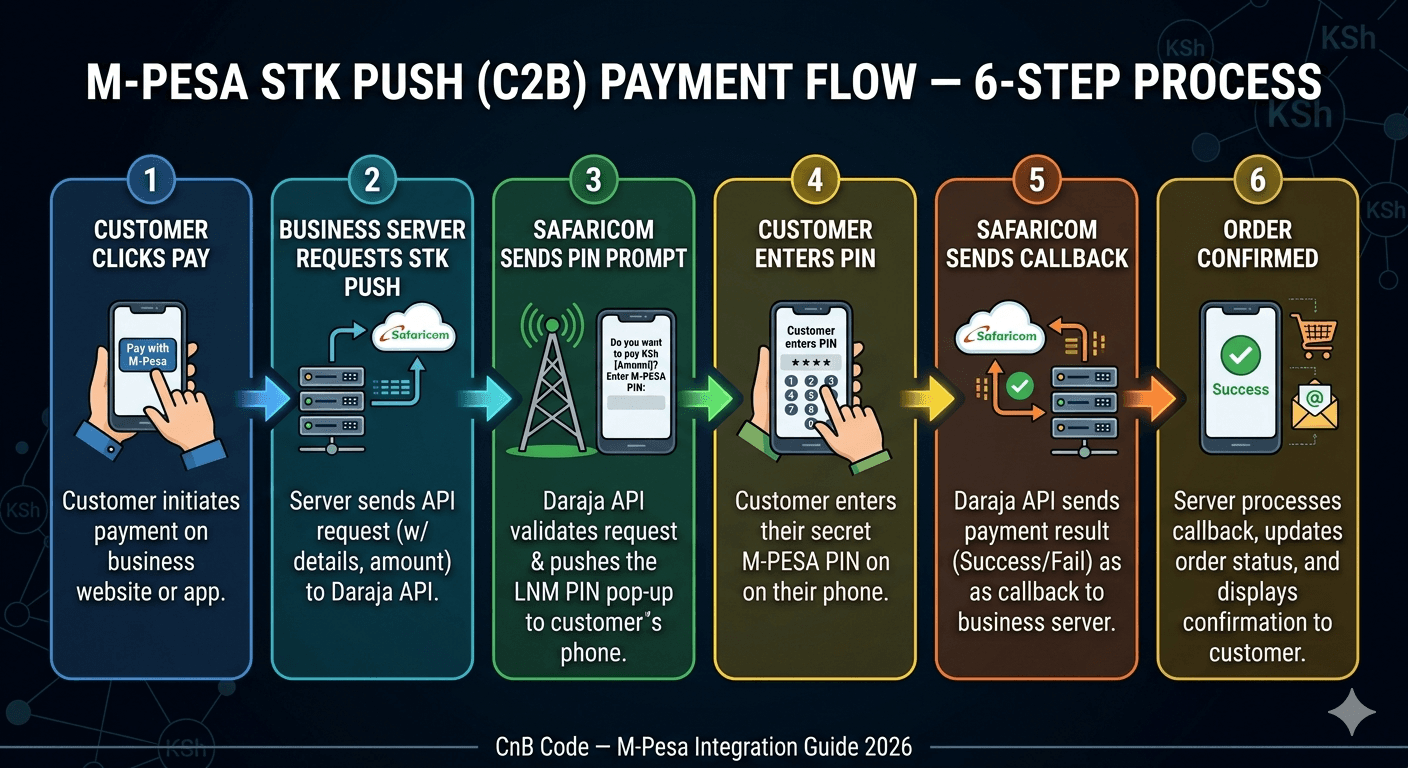
What your code handles in sequence:
Customer clicks Pay on your website
Your backend calls the STK Push endpoint with phone number, amount, and callback URL
Safaricom sends a PIN prompt to the customer's phone
Customer enters their M-Pesa PIN
Safaricom sends a POST request to your callback URL with the transaction result
Your system validates the callback and updates the order
Steps 5 and 6 are where most integrations break. If your callback is misconfigured or your handler doesn't process responses correctly, the customer gets debited but your system never confirms the payment.
For a full breakdown of what goes wrong at this stage,
and how to prevent it, see Why M-Pesa Integration Fails on Kenyan Business Websites.
Step 4: Configure Your Callback URL
Your callback URL receives payment confirmations from Safaricom. It must be:
HTTPS — not HTTP
Publicly accessible from the internet
Returning a 200 response quickly — Safaricom retries if your server is slow
Idempotent — processing the same callback twice must not create duplicate orders or charges
Security requirements:
Validate the amount received matches the expected amount
Validate the phone number matches the checkout session
Check the transaction receipt number hasn't been processed before
Never trust the callback payload without verification — anyone can POST to your URL
Step 5: Test in Sandbox
Safaricom's sandbox simulates the full payment flow without real money. Daraja 3.0's sandbox has had some reported stability issues in early 2026 — if you hit problems, the Kenyan developer community built an open-source local alternative called Pesa Playground for offline testing.
Test every scenario before going live — not just the success case:
Successful payment end to end
Customer cancels the STK push
Customer enters wrong PIN
Insufficient balance
Callback arrives late
Duplicate callback received
Step 6: Apply for Go-Live
Apply for production access through the Daraja portal. Safaricom reviews your integration before approving.
What they check:
Callback URL is live and returning correct responses
SSL certificate is valid and from a trusted authority
Business Paybill or Till number is active
Business registration documents are complete
Approval takes 3–10 business days. Most delays come from callback URL errors or SSL issues.
Once approved:
Swap sandbox credentials for production credentials
Update your callback URL to the production endpoint
Run one real low-amount transaction before opening to customers
Ongoing Maintenance
A working integration on launch day is not set and forget. Budget for:
Access token refresh — tokens expire every hour and must regenerate automatically
Safaricom API updates — Daraja 3.0 is actively evolving, monitor for changes
Monitoring — detect failed callbacks and authentication errors early
SSL renewal — an expired certificate silently breaks your entire callback handling
For realistic maintenance costs see our M-Pesa API cost breakdown.
Need Help With Your Integration?
CnB Code handles all three paths — WordPress plugin setup, payment gateway integration, and full Daraja API development from sandbox to production go-live.
Written by the Engineering Team at CnB Code
We build fast, scalable applications, complex API integrations, and automate business workflows. Based in Nairobi, serving ambitious businesses globally.
Need help implementing this? We're here to help.
Our engineering team at CnB Code specializes in building and integrating custom software solutions just like this for forward-thinking businesses.
Recommended for you
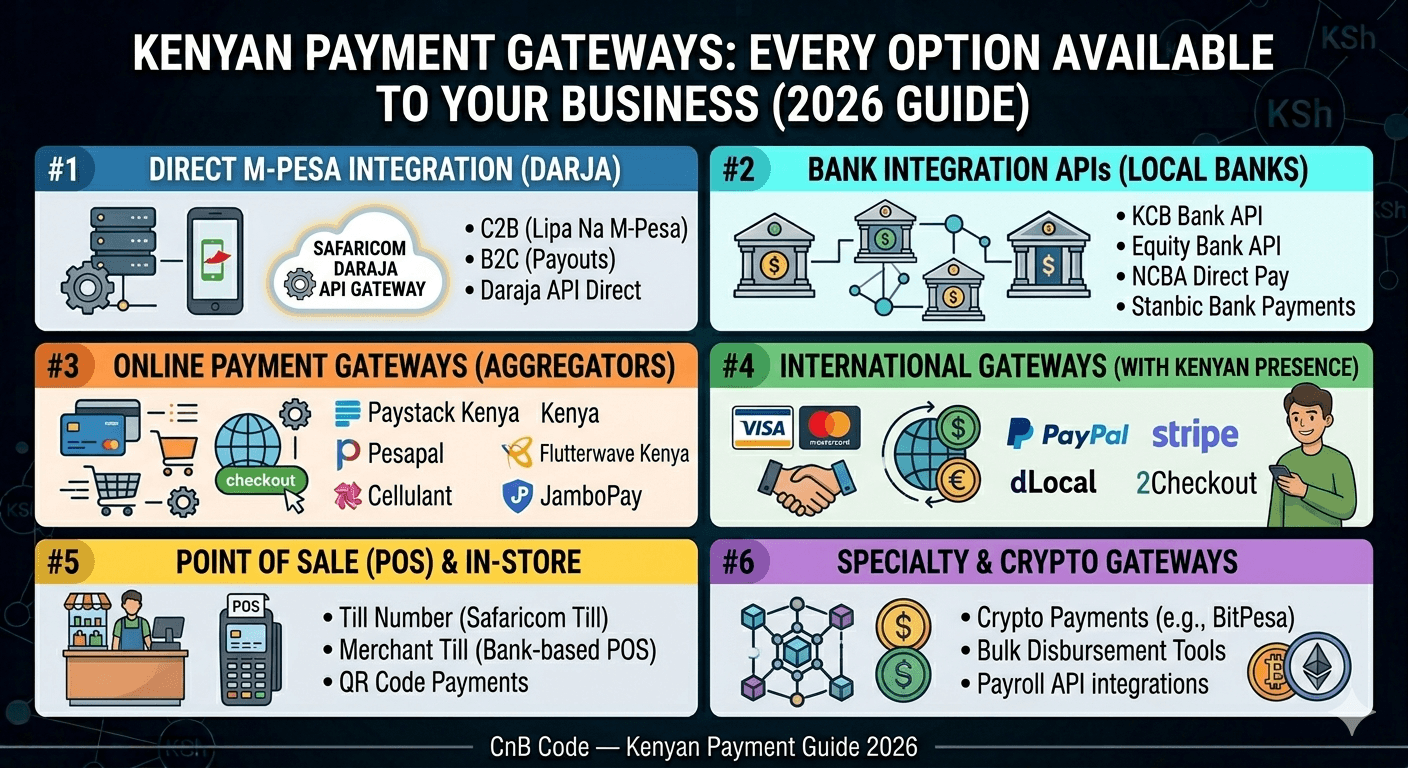
Payment Gateways in Kenya: Every Option Available to Your Business (2026)
Every payment gateway available to Kenyan businesses in 2026 — M-Pesa, cards, bank APIs, and cross-border options. Fees, features, and who each one is best for.
What is M-Pesa API and How Does It Work for Businesses?
M-Pesa API explained for Kenyan business owners. Learn how Daraja works, what STK Push means, and whether your business actually needs API integration.